What Is the Best Way to Handle Maintenance Requests Through Property Management Software?
The Moment Your Reputation Is Made or Lost
Maintenance is where residents judge you. It is the moment something in their home stops working, and how you respond defines whether they renew, recommend you, or leave a scathing review.
Most landlords and property managers want to respond quickly. The real bottleneck? Scattered workflows. Texts that disappear. Voicemails after hours. Incomplete descriptions. Missing photos. Unclear definitions of "emergency." Vendors who show up without unit details.
Here is what the data shows. According to NMHC and Grace Hill renter research, residents satisfied with maintenance are dramatically more likely to renew and recommend their property manager. On the operational side, Property Meld's 2024 benchmarking report (based on 8.6 million work orders) found average response time improved by 6.1 days compared with 2023. Property operations experts increasingly recommend responding to non-emergencies within 24 hours, because silence drives dissatisfaction faster than the repair itself.
The best way to handle maintenance requests in property management software is to build a single, end-to-end digital pipeline. Tenant submission, then triage and prioritization, then scheduling, then vendor assignment, then status tracking, then resident notifications, then SLA review, then closeout documentation, then KPI review.
The goal is not fewer calls. It is faster resolution, cleaner records, better vendor performance, and higher renewals.
What to do next
- If your team touches a request more than twice before it is assigned, you need better intake forms and clearer triage rules.
- If residents ask "any update?" more than once per work order, your workflow needs proactive status notifications.
What "Best" Looks Like in a Digital Maintenance Workflow
A modern maintenance workflow inside property management software is a controlled production system. "Best" does not mean the fanciest features. It means consistent outcomes. Quick acknowledgment, correct priority, the right technician, clear communication, and measurable performance.
Start by defining two clocks:
- Response time. How fast you acknowledge and begin action.
- Resolution time. How fast the issue is completed and confirmed.
Industry maintenance reporting standards distinguish response time as an operational metric that should be tracked across average and peak periods, not just "best days." This matters because residents do not experience your averages. They experience the delay when you are busiest. Property management benchmarking and software insights indicate that completion times can be reduced substantially when workflows are digitized and standardized.
A best-practice digital workflow includes
- Structured intake (required fields, photos, permission-to-enter, preferred times)
- Priority tiers (emergency vs. routine vs. preventive) with defined response targets
- Clear routing (by property, category, time of day, and after-hours rules)
- Vendor assignment logic (approved vendor list, coverage areas, pricing, insurance)
- Status tracking (new → triaged → assigned → scheduled → in progress → completed → verified → closed)
- Resident notifications at key transitions
- Performance review (first-time fix rate, average resolution time, work-order aging, vendor ratings)
This guide walks through a practical, step-by-step workflow you can implement in most modern systems.
What to do next
- Build your workflow around status changes. Each status should trigger a message, a timer, and an owner.
- Treat maintenance like revenue protection. Better maintenance reduces churn, and churn has a direct cost. Turnover, vacancy, leasing time.
End-to-End Workflow: Submission to Resolution
Step 1: Standardize Tenant Submission So Every Ticket Is Workable
Your workflow succeeds or fails at intake. A maintenance request should arrive with enough detail that your team can triage it without a phone call.
Configure your portal or app form to require
- Issue category (plumbing, electrical, HVAC, appliance, pest, safety and security)
- Severity prompts ("Is there active water flow?" "Any sparks or smoke?" "No heat?")
- Photos and video upload
- Permission-to-enter plus pet notes
- Best times and access notes (gate code, lockbox, and so on)
This aligns with the trend toward digital-first resident experiences. Renters increasingly expect online communication and quick acknowledgment, with many industry surveys highlighting a "within 24 hours" expectation for responsiveness.
Example: leaky faucet. Tenant submits "kitchen faucet dripping" with a photo. Your software captures the category and priority context, collects permission-to-enter, and routes to the right queue. This reduces back-and-forth and allows direct scheduling.
What to do next
- Add "what have you tried?" as a field to reduce duplicate visits.
- Make permission-to-enter required for non-emergency requests to speed scheduling.
Step 2: Apply Priority Tiers and Triage With Clear Rules
The best systems do not rely on a human reading every request in real time. Use clear priority tiers so the right queue receives the right ticket fast.
A practical priority model
- P0 Emergency. Active flooding, fire or smoke, gas odor, electrical hazard, no heat in extreme weather, unsecured entry or lock failure.
- P1 Urgent. No hot water, refrigerator down (food spoilage risk), toilet not flushing in a one-bath unit.
- P2 Routine. Minor leaks, appliance non-critical issues, cosmetic items.
- P3 Preventive or planned. Filter replacements, seasonal HVAC servicing, inspections.
Response targets (starting point)
- P0. Respond within 1 hour, dispatch within 4 hours.
- P2. Respond within 24 hours, resolve within 48 hours when parts and access allow.
Your local habitability laws may require tighter timelines for certain conditions. Confirm jurisdictional requirements and build your workflow to match.
Example: burst pipe at 2:13 AM. Tenant selects "water leak or flooding," checks "active water flow," uploads video. Your team:
- Tags as P0 Emergency
- Sends immediate safety instructions (shutoff location if known, avoid outlets)
- Routes to after-hours emergency queue
- Notifies on-call staff and preferred emergency plumber
What to do next
- Build a "false emergency" pathway. If a request is miscategorized, the triager can downgrade priority with one click, and the system sends an updated expectation message.
- Use after-hours rules to route only P0 and P1 to on-call. Everything else gets auto-acknowledged and queued for business hours.
Step 3: Acknowledge Instantly, Then Communicate a Clear Next Step
Residents judge the process more than the repair. Acknowledgment should immediately confirm receipt and set expectations.
Your acknowledgment should include
- Ticket number plus summary
- Priority label (Emergency, Urgent, Routine)
- Your target response window
- What happens next (triage call, dispatch, scheduling link)
- Safety steps (for P0)
This supports retention. Maintenance satisfaction is directly tied to renewal and recommendations in renter research, and service-gap data shows higher churn when experiences break down.
What to do next
- Create message templates per category (HVAC, plumbing, electrical) with "what to do right now."
- Send "we are waiting on you" alerts if you need entry permission or scheduling confirmation.
Step 4: Assign the Right Resource Fast Using Rules, Not Guesswork
Vendor assignment is where delays hide. Your workflow should help you decide who gets the job and how it is scheduled.
Best-practice assignment logic
- Route by property and region
- Route by trade
- Route by coverage hours (after-hours emergency list)
- Route by license and insurance requirements
- Route by not-to-exceed (NTE) approval thresholds (for example, auto-approve under $300, require approval above)
Automation and AI adoption in property management has been rising. Industry coverage suggests significant time savings are possible when workflows are standardized. Treat those figures as directional. Your result depends on how disciplined your routing rules are.
What to do next
- Maintain an "approved vendor matrix" in your records. Trade plus properties served plus emergency availability plus rate structure.
- Use vendor scorecards (see Step 8) to shift volume toward high performers over time.
Step 5: Schedule With Resident-Friendly Options and Lock in Access
Once assigned, the next bottleneck is scheduling, especially when entry permission is not clear.
Use software features (or procedures) to
- Offer appointment windows via portal or message
- Confirm permission-to-enter and pet instructions
- Provide arrival notifications ("Tech en route")
- Document access method (lockbox code stored securely, never in plain-text messages)
Example. For a P2 leaky faucet, you send a scheduling link with two windows. Tenant chooses "Wed 1 to 4 PM," confirms pets crated. The work order moves to Scheduled and the resident receives a confirmation.
What to do next
- Create a rule. If a ticket sits in "Assigned" for 8 business hours without a scheduled time, escalate to a coordinator.
- For repeat categories (a clogged disposal, for example), include a quick pre-visit checklist that prevents "no issue found" trips.
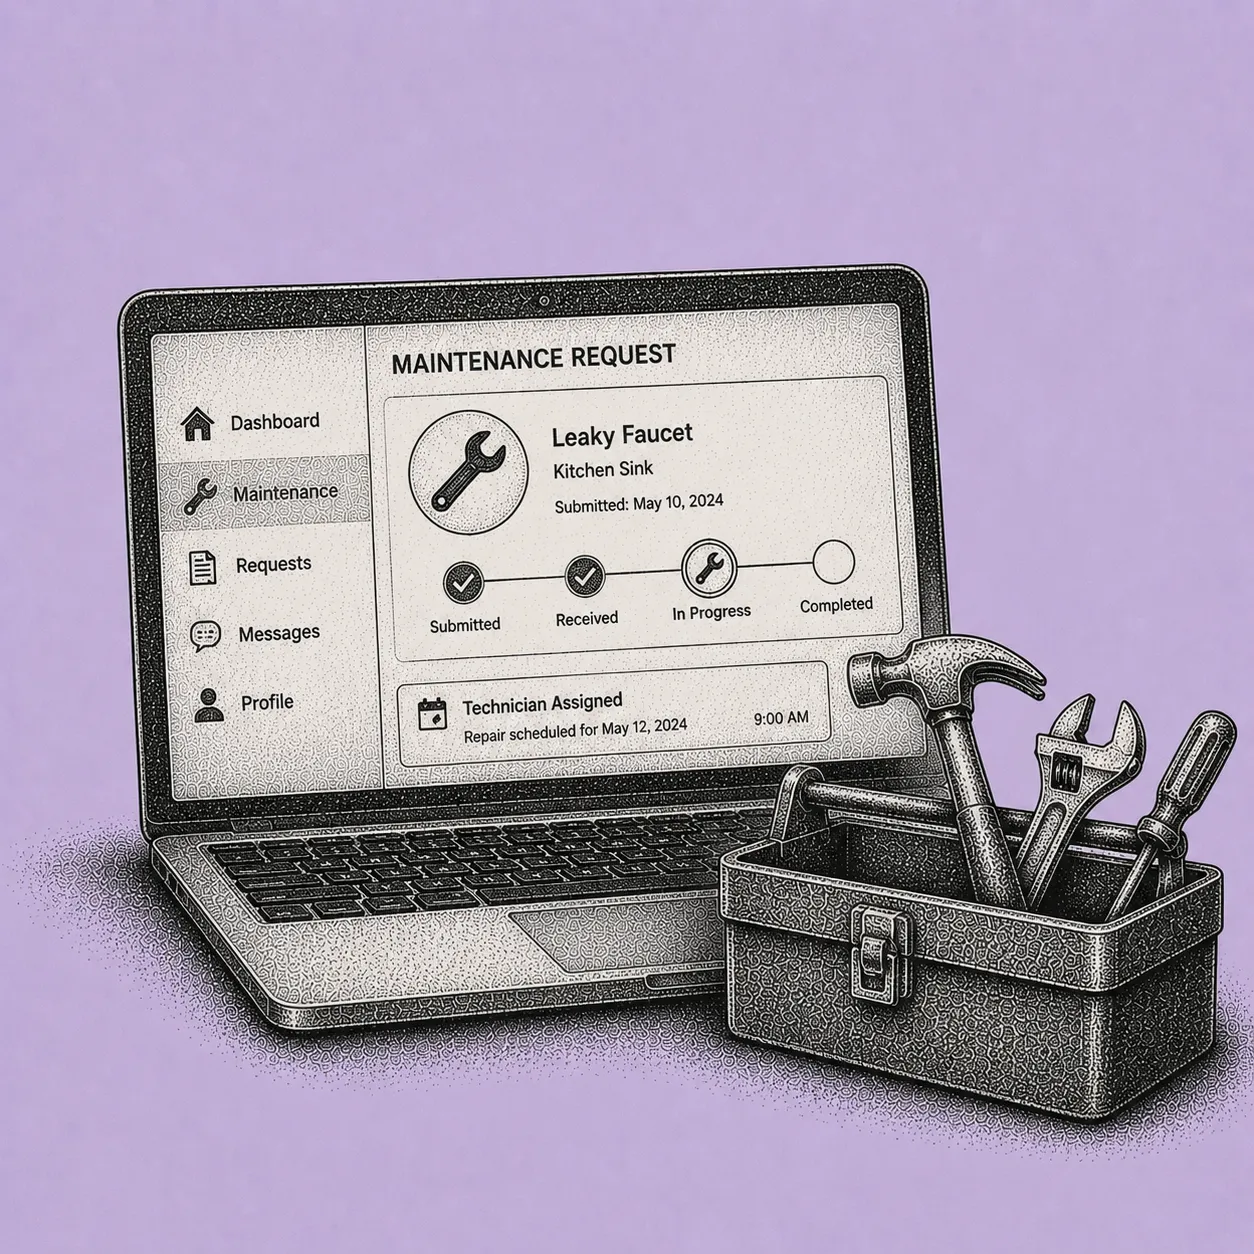
Step 6: Track Status Like a Pipeline. Make Status Changes Do the Work
A maintenance workflow is easiest to manage when every work order moves through consistent stages. Status discipline is what enables reporting, accountability, and resident communication.
Recommended statuses
- New (submitted)
- Triaged (priority confirmed, notes added)
- Assigned (tech or vendor selected)
- Scheduled (date and time confirmed)
- In Progress (on site or parts ordered)
- On Hold (awaiting parts, owner approval, or tenant action)
- Completed (work done)
- Verified (resident confirmation or QA check)
- Closed (documentation finalized)
Tie communication and review to status changes
- Resident notifications at Assigned, Scheduled, Completed
- Response timers paused or restarted (for example, "awaiting parts" pauses the resolution timer)
- Escalation triggers when aging thresholds are exceeded (for example, routine tickets older than 48 hours flagged)
Tracking response time correctly, including peak periods, helps you understand what residents actually experience, not just what your team remembers.
What to do next
- Make "On Hold" mandatory with a reason code. Otherwise "In Progress" becomes a dumping ground.
- Require a completion note and photo for high-risk categories (water intrusion, electrical).
Step 7: Close Out With Documentation, Resident Confirmation, and Cost Controls
Closeout is not clerical. It is risk management. You want a defensible record of what happened, when, and at what cost.
At completion, capture
- Labor and parts cost
- Vendor invoice attached
- Before and after photos (when relevant)
- Parts used (for inventory tracking)
- Root cause notes (for example, "angle stop failed due to corrosion")
- Resident confirmation (one-click "Issue resolved?")
Link this to your preventive strategy. One industry perspective encourages shifting from reactive to preventive maintenance, with a common target ratio around 60:40 preventive-to-reactive. Even if you are far from that, closeout data is how you identify repeat failures and schedule preventive work.
What to do next
- Use "problem codes" and "resolution codes" to identify repeat issues by asset (water heater, HVAC condenser, garbage disposal).
- Add a lightweight resident survey at close ("1 to 5: communication, timeliness, quality") to feed CX and vendor scoring.
Step 8: Manage by KPIs So the System Improves Every Month
The maintenance workflow is most valuable when it turns work orders into operational intelligence. Build a monthly maintenance review and treat it like you treat financials.
Core response targets to track
- Emergency (P0). Response within 1 hour, dispatch within 4 hours (or your defined standard)
- Routine (P2). Response within 24 hours, resolution within 48 hours when feasible
Maintenance KPIs that matter
- Average response time (by priority and by property)
- Average resolution time (by category and vendor)
- Work order aging (count of tickets over target)
- First-time fix rate (jobs completed without a follow-up visit)
- Reopen rate (tickets reopened within 7, 14, or 30 days)
- Cost per work order (by trade and property)
- Vendor performance rating (on-time percent, quality score, dispute rate)
Why invest in these metrics? Because resident satisfaction and renewal are tied to service delivery. Satisfied renters show materially higher likelihood to renew and recommend, and benchmarking shows response speed changes can be significant when teams measure and manage it.
Example. A 120-unit operator moved all requests to portal intake, enforced priority tiers, and implemented acknowledgment plus vendor routing. Within one quarter, routine tickets stopped aging unnoticed because the "Assigned but not Scheduled" escalation surfaced bottlenecks. They cut average completion time meaningfully, and resident complaints shifted from "no one got back to me" to specific scheduling needs. An indicator that communication and visibility improved.
What to do next
- Review KPI trends monthly. Change one rule at a time (for example, escalate routine tickets at 36 hours instead of 48) to see impact.
- Tie vendor volume to scorecards. More jobs for high first-time fix and low reopen rates.
Maintenance Workflow Configuration Checklist
Use this checklist as an internal SOP or as a workflow build sheet when configuring your property management software. The aim is to make maintenance predictable, auditable, and fast, without relying on heroics.
A) Intake (tenant portal or app)
- Required fields: category, description, unit area, photos and video, permission-to-enter, pets, best times
- Severity questions to detect emergencies (water flow, gas odor, sparks or smoke, no heat)
- Acknowledgment templates per category and priority
B) Priority tiers and response targets
- P0 Emergency. Response within 1 hour, dispatch within 4 hours (adjust per local requirements)
- P1 Urgent. Response same day, schedule within 24 hours (recommended)
- P2 Routine. Response within 24 hours, resolve target 48 hours when feasible
- On Hold reason codes pause the response timer (parts, access, approval)
C) Routing and assignment
- Routing rules by property, trade, hours (after-hours queue for P0 and P1 only)
- Approved vendor matrix: coverage, rates, license and insurance, emergency availability
- Not-to-exceed thresholds and approval workflow
D) Status and communication
- Standard statuses (New, Triaged, Assigned, Scheduled, In Progress, On Hold, Completed, Verified, Closed)
- Resident notifications at Assigned, Scheduled, and Completed, plus "waiting on you" messages
E) Closeout and reporting
- Completion notes required, invoice attachment, photos (when relevant)
- Monthly review: response time, resolution time, aging, first-time fix, reopen rate, vendor scorecard
What to do next
- Treat this as a quarterly audit. If your team cannot produce a clean work-order timeline for a random ticket in 60 seconds, refine fields and status rules.
FAQ
What response time should I promise residents?
For routine issues, many industry discussions emphasize acknowledgment within 24 hours and aiming for completion within 24 to 48 hours when possible. For emergencies, many organizations target response in 1 hour and urgent dispatch within 4 hours, with the understanding that severity and local rules may require faster action. Your specific habitability laws may impose tighter timelines for certain conditions like loss of heat in winter or active water leaks. Confirm jurisdictional requirements and build your workflow to match.
How do I prevent tenants from labeling everything as an emergency?
Use guided intake questions (active water flow, gas odor, sparks or smoke) and show a clear definition of emergencies during submission, consistent with common emergency examples like flooding, gas leaks, and electrical hazards. Then allow staff to downgrade priority with one click, triggering an updated expectation message to the tenant. The goal is not to reject legitimate concerns. It is to set accurate expectations so a routine issue does not block the queue for a genuine emergency.
Should I let residents text maintenance requests?
As a backup channel, yes. But route texts into the same system (convert to tickets) so documentation and timers are not lost. Research shows maintenance experience influences renewal and recommendations, so fragmented channels that slow response can directly harm retention outcomes. The cleanest setup is a single in-app or in-portal submission flow that captures category, photos, permission-to-enter, and contact preferences, with text as a fallback that gets transcribed into the same workflow.
Which KPIs matter most for operational ROI?
Start with average response time, average resolution time, work-order aging, first-time fix rate, and reopen rate. Those directly reflect speed, quality, and rework. And benchmarking indicates measurable speed improvements are possible when teams track and manage performance. Once those baselines are stable, add vendor scorecards (on-time percent, quality rating, dispute rate) and cost per work order by trade. The goal is data that lets you shift volume to high-performing vendors and identify recurring failures by asset.
What to Do Next
Pick one property (or 20 to 50 units) and run a 30-day maintenance workflow pilot. Configure structured intake, priority tiers, standardized triage, and status-based notifications. Then review response time, resolution time, aging, and reopen rates weekly. Once the pilot hits your response targets consistently, roll the same rules across the portfolio and start vendor scorecards to lock in the gains.
This is exactly the gap Shuk's maintenance request tracking is built to close, anchored on the parts of the workflow that matter most for documentation, communication, and accountability.
Shuk's maintenance request tracking lets tenants submit repair requests with photos, videos, documents, and notes, all timestamped and tied to the specific unit. You track each request from first report through completion, with a complete maintenance history maintained by property. Document storage keeps the vendor's quote, the invoice, and the before-and-after photos organized in one place per request. Centralized in-app messaging with email and push notifications gives you a time-stamped record of every scheduling exchange, status update, and completion confirmation, between you, the tenant, and (when needed) the vendor.
For the inspection step before a vendor quote, or any internal coordination you do not want visible to the tenant, you can create landlord-only maintenance tasks that you control entirely. Choose what to share with the tenant and what to keep internal. And when work involves tenant-caused damage that you are billing to the tenant under your lease, payment requests let you bill the tenant directly with attached notes, vendor invoices, and receipts, creating a complete paper trail for the charge.
The result. Whether you are running a single property or scaling a portfolio across multiple properties, every work order becomes a complete case file. Request, photos, communications, vendor documentation, invoices, and tenant confirmation. That is the audit trail that protects you when a tenant disputes a deposit deduction, when an insurance claim needs documentation, or when a vendor's work fails six months later and you need to prove what was done.
Around maintenance tracking, the same Shuk subscription gives you the rest of the rental operating stack. Online rent collection with zero ACH transaction fees and configurable late fees applied automatically. Tenant screening through our partner. E-signature for leases through our Adobe-powered integration. Schedule E-aligned expense organization with digital receipts (so vendor invoices feed directly into year-end reporting). The Lease Indication Tool for predictive lease renewal insights through monthly tenant polling starting six months before lease end. Two-Way Reviews between landlords and tenants that build verifiable rental reputations. And Year-Round Marketing.
At $5 per unit per month with no setup fees, and with White Glove Onboarding included at no additional cost (where the Shuk team handles property setup, account preparation, and renter onboarding for you), Shuk makes documented maintenance discipline feasible for landlords and property managers running 1 to 100 units. Shuk now supports third-party management with multi-user workflows and role-based access, so a property management team can run consistent maintenance documentation across an entire portfolio.
Book a demo at shukrentals.com/book-a-demo to see how Shuk's maintenance request tracking with photos and documents, landlord-only maintenance tasks, document storage, centralized in-app messaging, payment requests, Schedule E-aligned expense organization, online rent collection with zero ACH fees, automated late fees, tenant screening, e-signature, the Lease Indication Tool, Two-Way Reviews, and Year-Round Marketing work together so every work order has a complete case file behind it.