Maintenance Hub
Run Maintenance Like a System, Not a Scramble
Maintenance gets expensive when it lives in scattered texts, vendor voicemails, and disputed invoices. This hub covers preventive scheduling, vendor management, work order flow, emergency protocols, and cost tracking as one repeatable system.
Maintenance: Build a System That Reduces Emergencies and Controls Costs
Maintenance operations improve fastest when you pick one high-impact starting point and implement it end to end. The guides in this hub are organized by where you feel the most pain today, so you can start there and build toward a complete maintenance operating system over time. Use the links below to find your entry point.
Preventive Scheduling: Start Here If Emergencies Keep Blowing Up Your Week
Preventive maintenance is how you reclaim control. Industry findings consistently show that reactive maintenance costs are 25% to 30% higher than preventive work due to after-hours labor premiums, expedited parts, and the compounding inefficiency of treating everything as urgent. IFMA research emphasizes that proactive programs can reduce unexpected breakdowns and downtime while lowering overall maintenance costs. NAA notes that many operators have formal preventive maintenance programs, but the gap is execution: consistency, documentation, and scalable scheduling.
Practical starting points: Build a seasonal HVAC cadence with filter checks monthly during peak season and system inspections pre-summer and pre-winter, logging findings so "same unit, same issue" patterns become visible. Run quarterly leak checks at common failure points including under sinks, supply lines, and water heaters to reduce catastrophic events that trigger emergency pricing. Standardize make-ready inspections so small issues do not become day-three surprises that delay occupancy and inflate vacancy.
Actionable takeaway: Pick ten preventive tasks that address your most expensive recurring emergencies, schedule them for the next 30 days, and track completion before expanding. Build the schedule from your actual invoices and work orders, not a generic checklist. Recurring spend is the best indicator of what should become preventive.
Vendor Management: Start Here If Scheduling, No-Shows, and Inconsistent Pricing Are the Bottleneck
Most maintenance delays are not hard repairs. They are coordination failures: waiting on callbacks, unclear scopes, and missed appointments. Vendor management is the discipline of having the right vendors with the right expectations ready before you need them.
Practical starting points: Build a two-tier vendor bench with one preferred vendor and one backup for each trade covering plumbing, electrical, and HVAC. Require day-before and day-of confirmations for occupied-unit appointments to reduce wasted trips and resident frustration. Standardize what vendors must submit including photos, part numbers, and not-to-exceed thresholds before work begins to reduce invoice disputes and pricing discrepancies that are commonly tied to informal manual processes.
Actionable takeaway: Set three non-negotiables for every vendor: a response time target, required documentation, and a billing format. Then enforce it consistently. Your best vendor is often the one who is easiest to manage at scale, not necessarily the one with the lowest hourly rate.
Maintenance Workflows: Start Here If Requests Fall Through the Cracks
The maintenance workflow is the path every request follows: intake, triage, assignment, scheduling, completion, resident communication, and cost capture. When any step is ambiguous, you get repeat messages, rework, and stalled work orders.
Research consistently supports that workflow discipline matters. Automated maintenance systems can reduce average work order completion time by approximately 37% by tightening assignment, scheduling, and follow-up loops. Multifamily benchmarks show completion times measured in days rather than hours for many portfolios, reinforcing the value of removing manual bottlenecks.
Practical starting points: Define triage categories of emergency, urgent, and routine with response time expectations for each, so not everything is treated as a crisis. Send automatic status messages at key moments including received, scheduled, technician en route, and completed, because communication drives satisfaction and reduces duplicate tickets. Build a dedicated workflow for unit turns covering inspection, scope, parts, vendor scheduling, and final quality check so vacancy days do not inflate due to sequencing mistakes.
Actionable takeaway: Write your workflow in five statuses and commit to them. If a work order cannot be put in a status instantly, your process is too complicated for real operations.
Emergency Protocols: Start Here If You Are Reacting to Floods, Outages, and After-Hours Calls
Emergencies are inevitable. Chaos is optional. Reactive and emergency repairs commonly carry cost multipliers of three to five times the cost of scheduled work, plus after-hours labor premiums. Beyond cost, emergencies are where reputations are made or broken, especially when residents do not know what is happening.
Practical starting points: Map shutoff locations for every property and create a "first ten minutes" water event checklist with photo documentation steps for vendors and insurance. Build heat and air conditioning outage triage rules with temporary mitigation steps and vendor escalation rules based on temperature and local habitability requirements. Create three standard resident communication templates: one for "we are aware," one for "here is the estimated timeline," and one for "here is what you should do right now," to reduce inbound calls and confusion.
Actionable takeaway: Draft your emergency decision tree before the next emergency. If you only build it when you are already stressed, you will miss critical steps and lose time when minutes matter.
Cost Tracking: Start Here If Your Maintenance Spend Is Rising but You Cannot Explain Why
Maintenance costs become uncontrollable when they are not categorized, compared, and trended. Preventive maintenance is easier to defend financially when you can point to reduced breakdowns, fewer emergencies, and tighter vendor billing. IFMA research highlights material cost differences between reactive and preventive approaches. NAA also points to preventive programs producing operational expense reductions in the 12% to 18% range in some analyses, with compelling ROI when measured consistently.
Practical starting points: Track spend in system-level buckets covering HVAC, plumbing, electrical, appliances, exterior, and turns so you can see where costs are shifting. Set not-to-exceed approval thresholds for routine work so anything above the cap requires photos and scope review before approval. Flag repeat issues: if the same unit or asset type generates the same repair repeatedly, convert it into a preventive maintenance task. This is how reactive spend becomes planned spend over time.
Actionable takeaway: Hold a 30-minute monthly maintenance review covering your top five vendors by spend, your top five recurring issues, and the one preventive maintenance change you will make next month.
What Operational Improvement Actually Looks Like
Mini-case study 1, faster closes through standardized intake and automated routing: A small property team managing a mixed portfolio struggled with lost requests. Residents emailed, texted, and called. The same issue would be reported multiple times and vendor assignment depended on whoever noticed first. After standardizing intake into a single work-order workflow and using automation to route requests by category and trigger resident status updates, work orders closed faster, consistent with the approximately 37% reduction in completion time associated with automated maintenance processing in industry comparisons. Administrative time dropped because residents stopped checking in once updates became predictable. If your biggest problem is volume and follow-up, workflow automation is often the quickest win because it reduces coordination time before it reduces repair time.
Mini-case study 2, fewer emergencies by converting repeat repairs into a preventive plan: A landlord with older building systems faced repeated emergency calls especially around water and HVAC issues. Repairs were happening after failure, driving after-hours premiums. After identifying top recurring issues from invoices, building a small preventive schedule and executing it consistently, and shifting vendor relationships to include scheduled inspection blocks, the portfolio experienced fewer surprise breakdowns and more predictable monthly spend with fewer after-hours calls. The simplest preventive plan is often built from your last 90 days of work orders. Repeat issues are your roadmap.
Frequently Asked Questions
How do I set up a preventive maintenance schedule that is realistic?
Start with what breaks most often and what costs most when it breaks. List your critical systems covering HVAC, plumbing, electrical, appliances, and life-safety devices. Pick a minimum viable set of ten to fifteen tasks you can complete monthly or quarterly. Assign intervals by season and risk rather than trying to build a perfect comprehensive program upfront. Track completion in one place so missed preventive maintenance does not disappear. Review quarterly: if a task does not prevent issues, revise it. If a reactive issue repeats, add a preventive task for it. Build the schedule from your invoices and work orders, not from a generic template.
What is a reasonable maintenance turnaround time and how can workflows improve it?
Many multifamily maintenance operations measure completion in days rather than hours, with benchmarks around 3.88 days appearing in industry materials. When the process is manual, delays often happen before repairs begin through intake confusion, slow assignment, and repeated scheduling attempts. A single intake channel reduces duplicate tickets and missed details. Triage rules prevent routine requests from being treated like emergencies. Automated routing and reminders reduce the "waiting for someone to notice" gap. Status updates reduce resident follow-ups and administrative churn. Track two timestamps: submitted to scheduled, and scheduled to completed. Your biggest improvement opportunity is usually the longer of the two.
How do I prevent vendor no-shows and invoice surprises?
Vendor no-shows and billing disputes are symptoms of unclear expectations and weak documentation. Require day-before and day-of appointment confirmations for occupied units. Standardize scope formats requiring problem description, photos, and access notes in the work order. Set not-to-exceed approval caps for routine categories with documentation required above the threshold. Require invoices to reference the work order ID and include a parts and labor breakdown to reduce mismatches. Track on-time rate, documentation quality, and cost variance by vendor on a quarterly basis. If a vendor cannot follow your documentation requirements, they are not scalable regardless of their technical skill.
What is the most important thing to measure first in a maintenance operation?
Start with two baselines: average time from submitted to scheduled, and average time from scheduled to completed. Even without perfect data, tracking these exposes your biggest bottleneck. Then identify your top three recurring repairs from the past 90 days and convert them into preventive tasks. Reactive spend is the most actionable indicator of where your preventive investment should go next.
If you want to see how maintenance scheduling, vendor coordination, work orders, and expense tracking work together in one system built for landlords managing one to 100 units, book a demo and walk through how Shuk's maintenance workflow applies to your specific portfolio size and property types.
{
"@context": "https://schema.org",
"@type": "FAQPage",
"mainEntity": [
{
"@type": "Question",
"name": "How do I set up a preventive maintenance schedule that is realistic?",
"acceptedAnswer": {
"@type": "Answer",
"text": "Start with what breaks most often and what costs most when it breaks. Pick ten to fifteen tasks covering your critical systems and assign intervals by season and risk. Track completion in one place so missed tasks do not disappear. Review quarterly and build from your actual invoices and work orders rather than a generic template."
}
},
{
"@type": "Question",
"name": "What is a reasonable maintenance turnaround time and how can workflows improve it?",
"acceptedAnswer": {
"@type": "Answer",
"text": "Many portfolios measure completion in days rather than hours, with benchmarks around 3.88 days in industry data. A single intake channel, triage rules, automated routing, and status updates reduce both administrative delays and resident follow-up calls. Track submitted-to-scheduled and scheduled-to-completed separately since your biggest improvement is usually in the longer of the two."
}
},
{
"@type": "Question",
"name": "How do I prevent vendor no-shows and invoice surprises?",
"acceptedAnswer": {
"@type": "Answer",
"text": "Require day-before and day-of confirmations for occupied units. Standardize scope formats with problem description, photos, and access notes. Set not-to-exceed approval caps with documentation required above the threshold. Require invoices to reference the work order ID with a parts and labor breakdown. Track performance by vendor quarterly."
}
},
{
"@type": "Question",
"name": "What is the most important thing to measure first in a maintenance operation?",
"acceptedAnswer": {
"@type": "Answer",
"text": "Start with two baselines: average time from submitted to scheduled, and average time from scheduled to completed. Then identify your top three recurring repairs from the past 90 days and convert them into preventive tasks. Reactive spend is the most actionable indicator of where your preventive investment should go next."
}
}
]
}
Shuk helps landlords and property managers get ahead of vacancies, improve renewal visibility, and bring more predictability to every lease cycle.
Book a demo to get started with a free trial.
The following guides cover every dimension of a professional maintenance operation: how to build a preventive schedule by system and season, how to onboard and manage vendors with documented service-level expectations, how to design a work order workflow from intake through close so requests never fall through the cracks, how to prepare for emergencies before they happen, and how to track and analyze maintenance costs by unit and property. Together they give landlords and property teams the structure to shift from reactive firefighting to proactive system management.
The Real Problem: Gray Areas, Not Broken Toilets
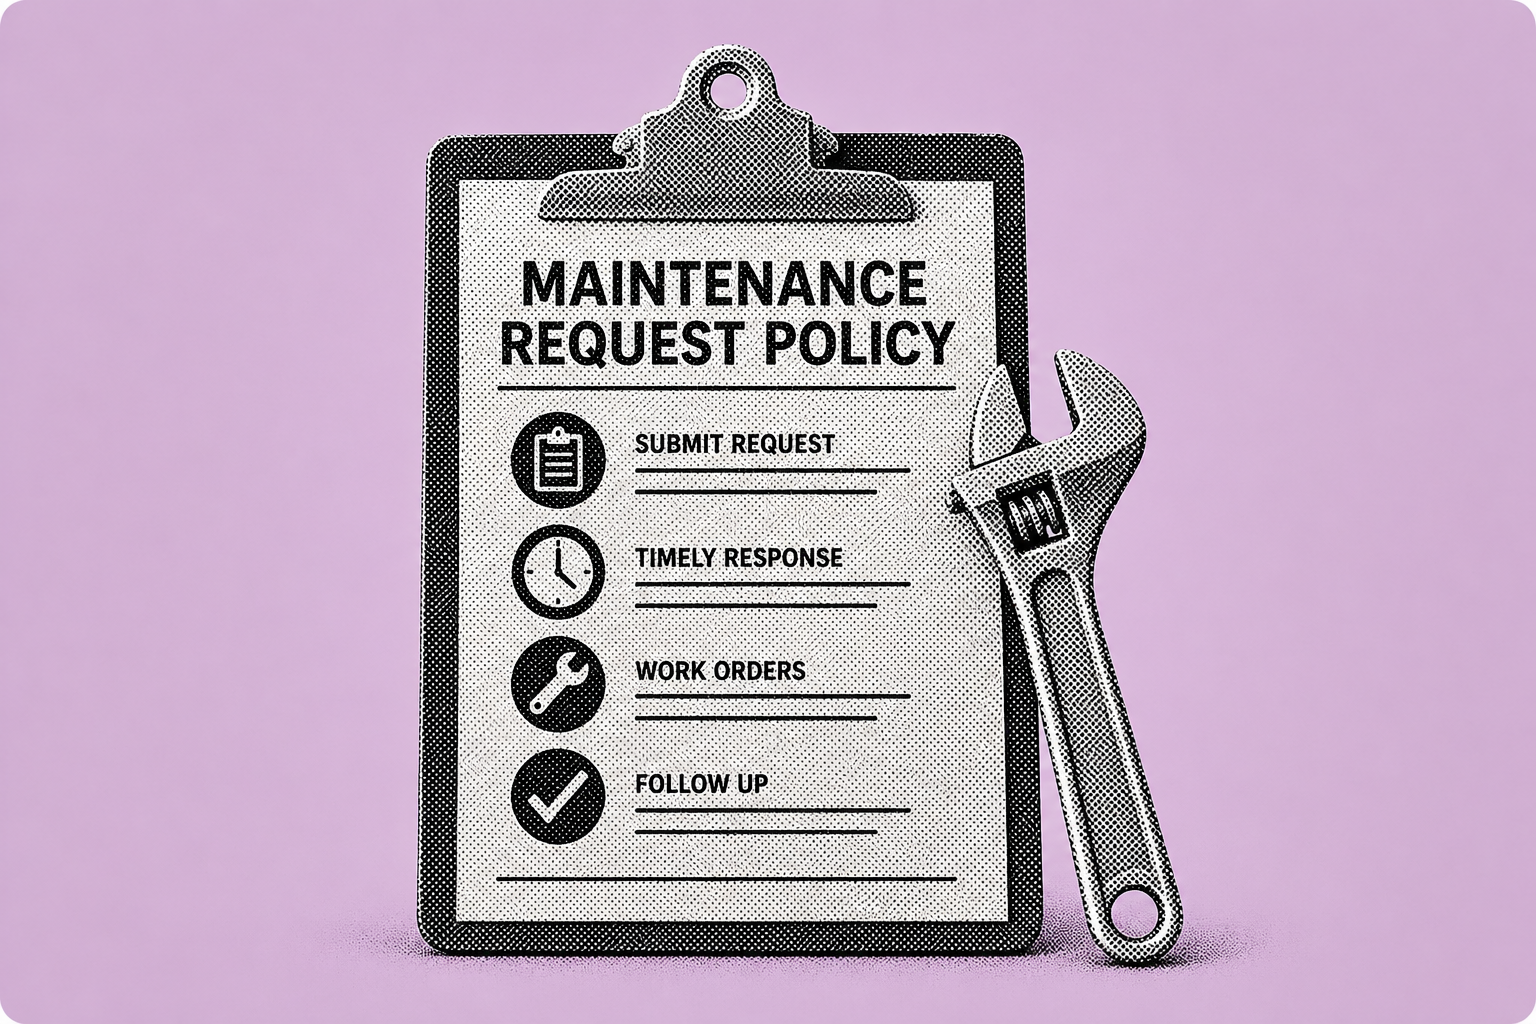
If you manage 1 to 50 units, fixing things is not the hard part. It is the chaos around fixing things. Tenants text leaks at midnight with no unit number. They email "ASAP" without photos. They call your plumber directly, or wait three weeks to mention a drip, then blame you for the damage. A written maintenance request policy stops that.
Maintenance drives most tenant friction. One industry roundup shows 79% of tenants cite slow response times as their top concern, per NAA reporting. Separate property management data estimates maintenance makes up roughly 55% of tenant complaints. In high-complaint cities, most unresolved violations trace back to basic categories like leaks, pests, and heat.
A clear rental property maintenance policy reduces disputes because it removes ambiguity. Tenants know what counts as an emergency, how to submit, what info to include, and what response times to expect.
Note: This article provides general education about maintenance request policies, not legal advice. Repair timelines, habitability standards, and tenant remedies vary by state and municipality. California commonly uses roughly 30 days as "reasonable time" for non-emergency repairs. Seattle's code specifies emergency repairs within 24 hours, urgent within 72 hours, and routine within 10 days. NYC categorizes violations with deadlines like 24 hours for immediately hazardous conditions, 30 days for hazardous, and 90 days for non-hazardous. Always confirm local requirements.
If you are still accepting maintenance requests through any channel tenants feel like using, your first fix is not a contractor. It is a written policy and a single intake system.
Step 1: Define and Publish Maintenance Categories
Start your maintenance request policy with definitions tenants can understand. A practical industry standard is: Emergency (respond 1 to 4 hours; resolve within 24 hours), Urgent (respond within 24 hours; resolve in 48 to 72 hours), and Routine (respond within 24 hours; resolve in 5 to 7 days).
Emergency (life/safety or active property damage). Active flooding, no heat during required heating season, gas smell, sparks/smoke, sewage backup.
Urgent (may become emergency, impacts habitability). Fridge not cooling, minor leak with bucket, toilet not flushing (only toilet), exterior door will not lock.
Routine. Dripping faucet, cabinet hinge, screen repair, cosmetic touch-ups.
A landlord who explicitly labels "water actively leaking" as an emergency and instructs tenants to shut off the nearest valve can prevent thousands in damage. Deferred maintenance can escalate costs dramatically: one maintenance analysis notes deferred issues can grow 3 to 4x over time.
Put a one-page "What counts as an emergency?" table in the lease packet and on the tenant portal. This alone reduces misclassified after-hours calls.
Step 2: Standardize How Tenants Submit Requests
Your rental property maintenance policy should state: "All non-emergency requests must be submitted through the approved system." If you accept texts, calls, emails, DMs, and sticky notes, you do not have a system. You have inbox roulette.
Specify required fields so your vendors can act fast: Unit address plus unit number. Category (Emergency/Urgent/Routine). Description (what happened, when it started, what you tried). Photos/video (required where applicable). Permission to enter plus lockbox instructions (or scheduling constraints). Pets (type, location, containment instructions).
Many "slow responses" are actually "slow intake." Given that 79% of tenants cite slow response times as their primary concern, tightening intake is an immediate win.
Plug-and-play rules: "Email is not a maintenance channel. Email is for billing, lease questions, and notices." "Texting is for emergencies only. If it is not an emergency, submit through the portal." "Requests without photos may be delayed because we cannot dispatch correctly."
Add a line to your policy: "If you contact a vendor directly without authorization, you may be responsible for the invoice." (Confirm enforceability in your state/local law.)
Step 3: Set Response-Time Targets
A strong maintenance request policy distinguishes response from resolution. Response = acknowledgment plus triage plus next step. Resolution = repair completed (or parts ordered with a scheduled return).
Use published benchmarks as a baseline (Emergency 1 to 4 hours; Urgent 24 hours; Routine respond in 24 hours and resolve 5 to 7 days), then tailor them to your capacity and local compliance rules. In Texas, repairs affecting health/safety generally require action after written notice and a reasonable time frame often discussed as up to seven days, per Property Code 92.052. In Chicago, the RLTO includes tenant remedies if repairs are not made after notice within stated windows for material noncompliance.
Maintenance satisfaction is strongly tied to renewal likelihood: tenants satisfied with maintenance are cited as 71% more likely to renew, per industry reporting. Your timeline is not just customer service; it is retention strategy.
Language tenants understand: "Routine: We respond within 1 business day. Typical completion is within 7 days unless parts are required." "Urgent: We respond within 24 hours and schedule within 72 hours when possible." "Emergency: Call the emergency line immediately. We respond as fast as possible, typically within 1 to 4 hours."
Step 4: Clarify Landlord vs. Tenant Responsibilities
Disputes often come from mismatched assumptions about responsibility.
Landlord responsibilities (typical). Structural, plumbing, electrical, HVAC, major appliances (if provided), pest control (depending on cause), code compliance, habitability essentials.
Tenant responsibilities (typical). Basic housekeeping that prevents damage, replacing light bulbs, notifying promptly of leaks, proper use of fans, not flushing prohibited items, changing HVAC filters if you assign it, reporting pests early.
Simple responsibility clauses: "Tenant must report water leaks immediately, even if minor." "Tenant agrees not to attempt repairs beyond resetting breakers, plunging a toilet, or shutting off a fixture valve." "If a clogged drain is caused by wipes/grease/hair beyond normal use, tenant may be billed."
Include a "first actions" box for tenants (shutoff locations, breaker panel, emergency contacts). It reduces damage and shows reasonableness.
Step 5: Build a Communication Plan for Move-In
A maintenance request policy only works if tenants remember it under stress. Communicate it three times: (1) Lease signing / move-in packet: one-page summary plus QR code to portal. (2) Move-in orientation: point out shutoffs, emergency line, and portal demo. (3) First 30 days: automated reminder email/text with "how to request maintenance" steps.
If 60% of renters want faster responses and 44% report long delays in the market, proactive communication is a competitive advantage.
Step 6: Enforce the Process When Tenants Bypass It
Even great tenants bypass systems when they are frustrated. Your maintenance request policy should include a calm, consistent enforcement script.
If a tenant texts a routine issue: "Please submit through the portal so we can schedule and track. Here is the link." If they email: reply with portal instructions and close the loop only after submission. If they call a vendor directly: notify the tenant in writing that unauthorized work may be billable (check your local laws and lease language).
A tenant reports "small leak under sink" via text and never submits formally. Two weeks later, you find warped cabinets at inspection. With a policy and system, you can show you asked for proper submission and did not receive it, reducing dispute heat while still fixing the issue.
Add one line: "Requests are not considered received until submitted through the approved system (except emergencies)."
Copy/Paste One-Page Maintenance Request Policy
Approved Request Method: Portal link/QR; emergency phone line.
Required Details: unit, category, description, photos/video, access permission, pets.
Maintenance Categories: Emergency / Urgent / Routine definitions plus examples.
Response and Repair Targets: response vs resolution; business hours; after-hours rules.
Tenant First Actions: shut off water valve, reset breaker, vacate for gas smell; call 911 if needed.
Landlord vs Tenant Responsibilities: misuse, clogs, filters, housekeeping, prompt reporting.
Unauthorized Repairs/Vendor Contact: not permitted without written approval; billing rules (subject to local law).
Consequences for Unreported Damage: tenant may be charged for avoidable damage per lease/local law.
Communication Updates: how you will update tenants; expected status notifications.
Local Law Note: "This policy does not limit tenant rights; timelines may vary by jurisdiction."
Include verbatim: "Emergency = active water leak, no heat in winter, gas odor, sparks/smoke." "Routine requests submitted by text/email will be redirected to the portal." "Photos are required for leaks, electrical, appliances, and pest issues."
Frequently Asked Questions
What if a tenant insists their issue is an "emergency" but it is not?
Use your definitions and respond with a triage step: acknowledge quickly, ask for photos/video, and reclassify. Published category standards help you stay consistent.
Can I set my own repair timelines?
You can set internal targets, but you must also follow local requirements. Some cities are explicit (Seattle's 24 hours for emergency repairs), while other jurisdictions rely on "reasonable time" concepts (California commonly references roughly 30 days for non-emergencies). Check local laws.
How does maintenance affect renewals?
Multiple industry reports link maintenance experience to retention. One renter preferences report cites that tenants satisfied with maintenance are 71% more likely to renew, and maintenance quality is widely cited as a top renewal predictor.
What to Do Next
Take 30 minutes today to turn your unwritten rules into a written maintenance request policy, then implement a single intake channel so tenants submit complete, trackable requests.
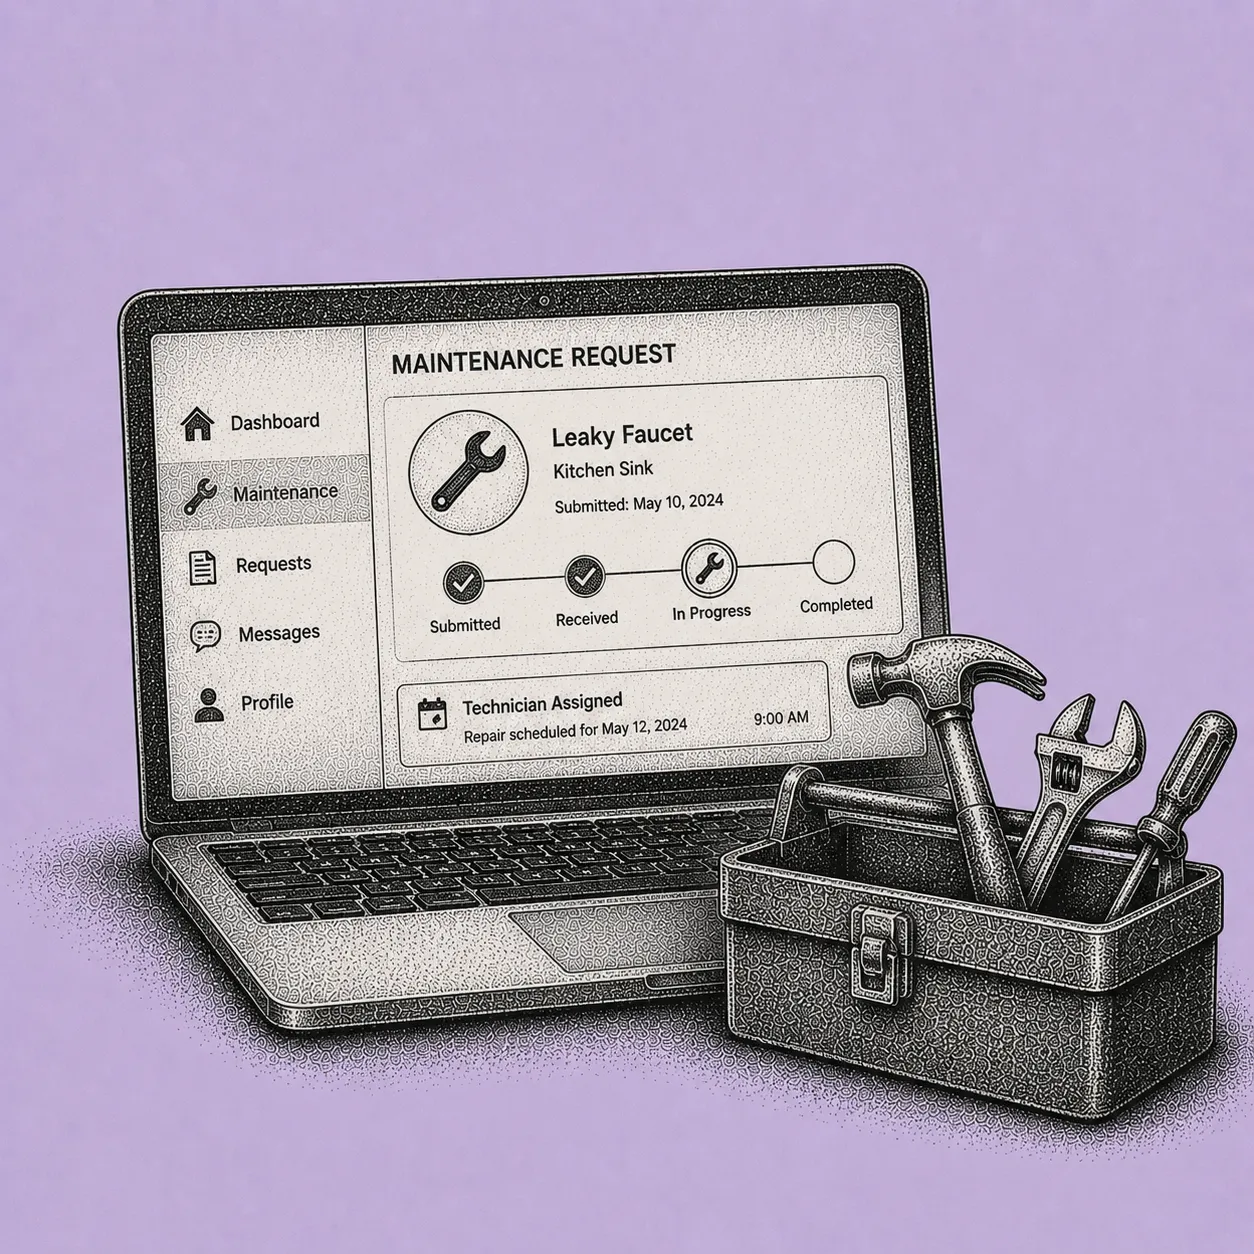
Shuk's maintenance request tracking lets tenants submit issues with photos, videos, documents, and notes, creating a documented work order per unit. Centralized in-app messaging with email and push notifications keeps maintenance communication time-stamped and searchable, so "I told you about it" disputes are resolved by records. Document storage keeps work orders, vendor invoices, and completion records organized per property. And the documented maintenance history supports deposit deductions at move-out and retention conversations at renewal.
At $5 per unit per month with no setup fees, and with White Glove Onboarding included at no additional cost, Shuk makes structured maintenance management feasible for landlords and property managers running 1 to 100 units.
Book a demo at shukrentals.com/book-a-demo to see how maintenance request tracking, messaging, and document storage work together so your maintenance process is organized, documented, and dispute-resistant.
What Is the Best Way to Handle Maintenance Requests Through Property Management Software?
The Moment Your Reputation Is Made or Lost
Maintenance is where residents judge you. It is the moment something in their home stops working, and how you respond defines whether they renew, recommend you, or leave a scathing review.
Most landlords and property managers want to respond quickly. The real bottleneck? Scattered workflows. Texts that disappear. Voicemails after hours. Incomplete descriptions. Missing photos. Unclear definitions of "emergency." Vendors who show up without unit details.
Here is what the data shows. According to NMHC and Grace Hill renter research, residents satisfied with maintenance are dramatically more likely to renew and recommend their property manager. On the operational side, Property Meld's 2024 benchmarking report (based on 8.6 million work orders) found average response time improved by 6.1 days compared with 2023. Property operations experts increasingly recommend responding to non-emergencies within 24 hours, because silence drives dissatisfaction faster than the repair itself.
The best way to handle maintenance requests in property management software is to build a single, end-to-end digital pipeline. Tenant submission, then triage and prioritization, then scheduling, then vendor assignment, then status tracking, then resident notifications, then SLA review, then closeout documentation, then KPI review.
The goal is not fewer calls. It is faster resolution, cleaner records, better vendor performance, and higher renewals.
What to do next
- If your team touches a request more than twice before it is assigned, you need better intake forms and clearer triage rules.
- If residents ask "any update?" more than once per work order, your workflow needs proactive status notifications.
What "Best" Looks Like in a Digital Maintenance Workflow
A modern maintenance workflow inside property management software is a controlled production system. "Best" does not mean the fanciest features. It means consistent outcomes. Quick acknowledgment, correct priority, the right technician, clear communication, and measurable performance.
Start by defining two clocks:
- Response time. How fast you acknowledge and begin action.
- Resolution time. How fast the issue is completed and confirmed.
Industry maintenance reporting standards distinguish response time as an operational metric that should be tracked across average and peak periods, not just "best days." This matters because residents do not experience your averages. They experience the delay when you are busiest. Property management benchmarking and software insights indicate that completion times can be reduced substantially when workflows are digitized and standardized.
A best-practice digital workflow includes
- Structured intake (required fields, photos, permission-to-enter, preferred times)
- Priority tiers (emergency vs. routine vs. preventive) with defined response targets
- Clear routing (by property, category, time of day, and after-hours rules)
- Vendor assignment logic (approved vendor list, coverage areas, pricing, insurance)
- Status tracking (new → triaged → assigned → scheduled → in progress → completed → verified → closed)
- Resident notifications at key transitions
- Performance review (first-time fix rate, average resolution time, work-order aging, vendor ratings)
This guide walks through a practical, step-by-step workflow you can implement in most modern systems.
What to do next
- Build your workflow around status changes. Each status should trigger a message, a timer, and an owner.
- Treat maintenance like revenue protection. Better maintenance reduces churn, and churn has a direct cost. Turnover, vacancy, leasing time.
End-to-End Workflow: Submission to Resolution
Step 1: Standardize Tenant Submission So Every Ticket Is Workable
Your workflow succeeds or fails at intake. A maintenance request should arrive with enough detail that your team can triage it without a phone call.
Configure your portal or app form to require
- Issue category (plumbing, electrical, HVAC, appliance, pest, safety and security)
- Severity prompts ("Is there active water flow?" "Any sparks or smoke?" "No heat?")
- Photos and video upload
- Permission-to-enter plus pet notes
- Best times and access notes (gate code, lockbox, and so on)
This aligns with the trend toward digital-first resident experiences. Renters increasingly expect online communication and quick acknowledgment, with many industry surveys highlighting a "within 24 hours" expectation for responsiveness.
Example: leaky faucet. Tenant submits "kitchen faucet dripping" with a photo. Your software captures the category and priority context, collects permission-to-enter, and routes to the right queue. This reduces back-and-forth and allows direct scheduling.
What to do next
- Add "what have you tried?" as a field to reduce duplicate visits.
- Make permission-to-enter required for non-emergency requests to speed scheduling.
Step 2: Apply Priority Tiers and Triage With Clear Rules
The best systems do not rely on a human reading every request in real time. Use clear priority tiers so the right queue receives the right ticket fast.
A practical priority model
- P0 Emergency. Active flooding, fire or smoke, gas odor, electrical hazard, no heat in extreme weather, unsecured entry or lock failure.
- P1 Urgent. No hot water, refrigerator down (food spoilage risk), toilet not flushing in a one-bath unit.
- P2 Routine. Minor leaks, appliance non-critical issues, cosmetic items.
- P3 Preventive or planned. Filter replacements, seasonal HVAC servicing, inspections.
Response targets (starting point)
- P0. Respond within 1 hour, dispatch within 4 hours.
- P2. Respond within 24 hours, resolve within 48 hours when parts and access allow.
Your local habitability laws may require tighter timelines for certain conditions. Confirm jurisdictional requirements and build your workflow to match.
Example: burst pipe at 2:13 AM. Tenant selects "water leak or flooding," checks "active water flow," uploads video. Your team:
- Tags as P0 Emergency
- Sends immediate safety instructions (shutoff location if known, avoid outlets)
- Routes to after-hours emergency queue
- Notifies on-call staff and preferred emergency plumber
What to do next
- Build a "false emergency" pathway. If a request is miscategorized, the triager can downgrade priority with one click, and the system sends an updated expectation message.
- Use after-hours rules to route only P0 and P1 to on-call. Everything else gets auto-acknowledged and queued for business hours.
Step 3: Acknowledge Instantly, Then Communicate a Clear Next Step
Residents judge the process more than the repair. Acknowledgment should immediately confirm receipt and set expectations.
Your acknowledgment should include
- Ticket number plus summary
- Priority label (Emergency, Urgent, Routine)
- Your target response window
- What happens next (triage call, dispatch, scheduling link)
- Safety steps (for P0)
This supports retention. Maintenance satisfaction is directly tied to renewal and recommendations in renter research, and service-gap data shows higher churn when experiences break down.
What to do next
- Create message templates per category (HVAC, plumbing, electrical) with "what to do right now."
- Send "we are waiting on you" alerts if you need entry permission or scheduling confirmation.
Step 4: Assign the Right Resource Fast Using Rules, Not Guesswork
Vendor assignment is where delays hide. Your workflow should help you decide who gets the job and how it is scheduled.
Best-practice assignment logic
- Route by property and region
- Route by trade
- Route by coverage hours (after-hours emergency list)
- Route by license and insurance requirements
- Route by not-to-exceed (NTE) approval thresholds (for example, auto-approve under $300, require approval above)
Automation and AI adoption in property management has been rising. Industry coverage suggests significant time savings are possible when workflows are standardized. Treat those figures as directional. Your result depends on how disciplined your routing rules are.
What to do next
- Maintain an "approved vendor matrix" in your records. Trade plus properties served plus emergency availability plus rate structure.
- Use vendor scorecards (see Step 8) to shift volume toward high performers over time.
Step 5: Schedule With Resident-Friendly Options and Lock in Access
Once assigned, the next bottleneck is scheduling, especially when entry permission is not clear.
Use software features (or procedures) to
- Offer appointment windows via portal or message
- Confirm permission-to-enter and pet instructions
- Provide arrival notifications ("Tech en route")
- Document access method (lockbox code stored securely, never in plain-text messages)
Example. For a P2 leaky faucet, you send a scheduling link with two windows. Tenant chooses "Wed 1 to 4 PM," confirms pets crated. The work order moves to Scheduled and the resident receives a confirmation.
What to do next
- Create a rule. If a ticket sits in "Assigned" for 8 business hours without a scheduled time, escalate to a coordinator.
- For repeat categories (a clogged disposal, for example), include a quick pre-visit checklist that prevents "no issue found" trips.
Step 6: Track Status Like a Pipeline. Make Status Changes Do the Work
A maintenance workflow is easiest to manage when every work order moves through consistent stages. Status discipline is what enables reporting, accountability, and resident communication.
Recommended statuses
- New (submitted)
- Triaged (priority confirmed, notes added)
- Assigned (tech or vendor selected)
- Scheduled (date and time confirmed)
- In Progress (on site or parts ordered)
- On Hold (awaiting parts, owner approval, or tenant action)
- Completed (work done)
- Verified (resident confirmation or QA check)
- Closed (documentation finalized)
Tie communication and review to status changes
- Resident notifications at Assigned, Scheduled, Completed
- Response timers paused or restarted (for example, "awaiting parts" pauses the resolution timer)
- Escalation triggers when aging thresholds are exceeded (for example, routine tickets older than 48 hours flagged)
Tracking response time correctly, including peak periods, helps you understand what residents actually experience, not just what your team remembers.
What to do next
- Make "On Hold" mandatory with a reason code. Otherwise "In Progress" becomes a dumping ground.
- Require a completion note and photo for high-risk categories (water intrusion, electrical).
Step 7: Close Out With Documentation, Resident Confirmation, and Cost Controls
Closeout is not clerical. It is risk management. You want a defensible record of what happened, when, and at what cost.
At completion, capture
- Labor and parts cost
- Vendor invoice attached
- Before and after photos (when relevant)
- Parts used (for inventory tracking)
- Root cause notes (for example, "angle stop failed due to corrosion")
- Resident confirmation (one-click "Issue resolved?")
Link this to your preventive strategy. One industry perspective encourages shifting from reactive to preventive maintenance, with a common target ratio around 60:40 preventive-to-reactive. Even if you are far from that, closeout data is how you identify repeat failures and schedule preventive work.
What to do next
- Use "problem codes" and "resolution codes" to identify repeat issues by asset (water heater, HVAC condenser, garbage disposal).
- Add a lightweight resident survey at close ("1 to 5: communication, timeliness, quality") to feed CX and vendor scoring.
Step 8: Manage by KPIs So the System Improves Every Month
The maintenance workflow is most valuable when it turns work orders into operational intelligence. Build a monthly maintenance review and treat it like you treat financials.
Core response targets to track
- Emergency (P0). Response within 1 hour, dispatch within 4 hours (or your defined standard)
- Routine (P2). Response within 24 hours, resolution within 48 hours when feasible
Maintenance KPIs that matter
- Average response time (by priority and by property)
- Average resolution time (by category and vendor)
- Work order aging (count of tickets over target)
- First-time fix rate (jobs completed without a follow-up visit)
- Reopen rate (tickets reopened within 7, 14, or 30 days)
- Cost per work order (by trade and property)
- Vendor performance rating (on-time percent, quality score, dispute rate)
Why invest in these metrics? Because resident satisfaction and renewal are tied to service delivery. Satisfied renters show materially higher likelihood to renew and recommend, and benchmarking shows response speed changes can be significant when teams measure and manage it.
Example. A 120-unit operator moved all requests to portal intake, enforced priority tiers, and implemented acknowledgment plus vendor routing. Within one quarter, routine tickets stopped aging unnoticed because the "Assigned but not Scheduled" escalation surfaced bottlenecks. They cut average completion time meaningfully, and resident complaints shifted from "no one got back to me" to specific scheduling needs. An indicator that communication and visibility improved.
What to do next
- Review KPI trends monthly. Change one rule at a time (for example, escalate routine tickets at 36 hours instead of 48) to see impact.
- Tie vendor volume to scorecards. More jobs for high first-time fix and low reopen rates.
Maintenance Workflow Configuration Checklist
Use this checklist as an internal SOP or as a workflow build sheet when configuring your property management software. The aim is to make maintenance predictable, auditable, and fast, without relying on heroics.
A) Intake (tenant portal or app)
- Required fields: category, description, unit area, photos and video, permission-to-enter, pets, best times
- Severity questions to detect emergencies (water flow, gas odor, sparks or smoke, no heat)
- Acknowledgment templates per category and priority
B) Priority tiers and response targets
- P0 Emergency. Response within 1 hour, dispatch within 4 hours (adjust per local requirements)
- P1 Urgent. Response same day, schedule within 24 hours (recommended)
- P2 Routine. Response within 24 hours, resolve target 48 hours when feasible
- On Hold reason codes pause the response timer (parts, access, approval)
C) Routing and assignment
- Routing rules by property, trade, hours (after-hours queue for P0 and P1 only)
- Approved vendor matrix: coverage, rates, license and insurance, emergency availability
- Not-to-exceed thresholds and approval workflow
D) Status and communication
- Standard statuses (New, Triaged, Assigned, Scheduled, In Progress, On Hold, Completed, Verified, Closed)
- Resident notifications at Assigned, Scheduled, and Completed, plus "waiting on you" messages
E) Closeout and reporting
- Completion notes required, invoice attachment, photos (when relevant)
- Monthly review: response time, resolution time, aging, first-time fix, reopen rate, vendor scorecard
What to do next
- Treat this as a quarterly audit. If your team cannot produce a clean work-order timeline for a random ticket in 60 seconds, refine fields and status rules.
FAQ
What response time should I promise residents?
For routine issues, many industry discussions emphasize acknowledgment within 24 hours and aiming for completion within 24 to 48 hours when possible. For emergencies, many organizations target response in 1 hour and urgent dispatch within 4 hours, with the understanding that severity and local rules may require faster action. Your specific habitability laws may impose tighter timelines for certain conditions like loss of heat in winter or active water leaks. Confirm jurisdictional requirements and build your workflow to match.
How do I prevent tenants from labeling everything as an emergency?
Use guided intake questions (active water flow, gas odor, sparks or smoke) and show a clear definition of emergencies during submission, consistent with common emergency examples like flooding, gas leaks, and electrical hazards. Then allow staff to downgrade priority with one click, triggering an updated expectation message to the tenant. The goal is not to reject legitimate concerns. It is to set accurate expectations so a routine issue does not block the queue for a genuine emergency.
Should I let residents text maintenance requests?
As a backup channel, yes. But route texts into the same system (convert to tickets) so documentation and timers are not lost. Research shows maintenance experience influences renewal and recommendations, so fragmented channels that slow response can directly harm retention outcomes. The cleanest setup is a single in-app or in-portal submission flow that captures category, photos, permission-to-enter, and contact preferences, with text as a fallback that gets transcribed into the same workflow.
Which KPIs matter most for operational ROI?
Start with average response time, average resolution time, work-order aging, first-time fix rate, and reopen rate. Those directly reflect speed, quality, and rework. And benchmarking indicates measurable speed improvements are possible when teams track and manage performance. Once those baselines are stable, add vendor scorecards (on-time percent, quality rating, dispute rate) and cost per work order by trade. The goal is data that lets you shift volume to high-performing vendors and identify recurring failures by asset.
What to Do Next
Pick one property (or 20 to 50 units) and run a 30-day maintenance workflow pilot. Configure structured intake, priority tiers, standardized triage, and status-based notifications. Then review response time, resolution time, aging, and reopen rates weekly. Once the pilot hits your response targets consistently, roll the same rules across the portfolio and start vendor scorecards to lock in the gains.
This is exactly the gap Shuk's maintenance request tracking is built to close, anchored on the parts of the workflow that matter most for documentation, communication, and accountability.
Shuk's maintenance request tracking lets tenants submit repair requests with photos, videos, documents, and notes, all timestamped and tied to the specific unit. You track each request from first report through completion, with a complete maintenance history maintained by property. Document storage keeps the vendor's quote, the invoice, and the before-and-after photos organized in one place per request. Centralized in-app messaging with email and push notifications gives you a time-stamped record of every scheduling exchange, status update, and completion confirmation, between you, the tenant, and (when needed) the vendor.
For the inspection step before a vendor quote, or any internal coordination you do not want visible to the tenant, you can create landlord-only maintenance tasks that you control entirely. Choose what to share with the tenant and what to keep internal. And when work involves tenant-caused damage that you are billing to the tenant under your lease, payment requests let you bill the tenant directly with attached notes, vendor invoices, and receipts, creating a complete paper trail for the charge.
The result. Whether you are running a single property or scaling a portfolio across multiple properties, every work order becomes a complete case file. Request, photos, communications, vendor documentation, invoices, and tenant confirmation. That is the audit trail that protects you when a tenant disputes a deposit deduction, when an insurance claim needs documentation, or when a vendor's work fails six months later and you need to prove what was done.
Around maintenance tracking, the same Shuk subscription gives you the rest of the rental operating stack. Online rent collection with zero ACH transaction fees and configurable late fees applied automatically. Tenant screening through our partner. E-signature for leases through our Adobe-powered integration. Schedule E-aligned expense organization with digital receipts (so vendor invoices feed directly into year-end reporting). The Lease Indication Tool for predictive lease renewal insights through monthly tenant polling starting six months before lease end. Two-Way Reviews between landlords and tenants that build verifiable rental reputations. And Year-Round Marketing.
At $5 per unit per month with no setup fees, and with White Glove Onboarding included at no additional cost (where the Shuk team handles property setup, account preparation, and renter onboarding for you), Shuk makes documented maintenance discipline feasible for landlords and property managers running 1 to 100 units. Shuk now supports third-party management with multi-user workflows and role-based access, so a property management team can run consistent maintenance documentation across an entire portfolio.
Book a demo at shukrentals.com/book-a-demo to see how Shuk's maintenance request tracking with photos and documents, landlord-only maintenance tasks, document storage, centralized in-app messaging, payment requests, Schedule E-aligned expense organization, online rent collection with zero ACH fees, automated late fees, tenant screening, e-signature, the Lease Indication Tool, Two-Way Reviews, and Year-Round Marketing work together so every work order has a complete case file behind it.

What Should Landlords Look for in a Service Provider Network?
The Real Cost of Unreliable Maintenance
Every landlord has lived through a contractor nightmare. The plumber who ghosts after two no-shows. The HVAC tech whose "repair" fails the following weekend. The handyman who vanishes when you need warranty work. The invoice is frustrating, but the real damage is vacancy days, tenant frustration, and the hours you spend managing chaos instead of growing your portfolio.
Here is what the data shows. AppFolio's renter research found that slow repairs drive move-outs. 60% of renters cite maintenance delays as a reason they would leave or consider leaving. Freddie Mac's renter research shows only about 60% of renters are satisfied with maintenance services overall, which means significant room to improve the resident experience through faster, clearer maintenance delivery. Once a tenant leaves, turnover costs add up fast. One industry estimate puts average tenant turnover at about $3,872 when you factor in lost rent and make-ready costs.
Two patterns you have likely seen. A minor leak becomes a major restoration claim because you could not get a qualified vendor in time. A "cheap" vendor becomes expensive after repeat calls, refunds, and concessions to keep a tenant from breaking the lease. A pre-vetted service provider network is designed to prevent both scenarios, and a well-run maintenance workflow inside your property management software is what makes any network you choose actually deliver.
What a Service Provider Network Actually Does
A maintenance service provider network is more than a contact list. Done well, it is an operating system for repairs. Vetted vendors, documented compliance (insurance and licensing), defined response expectations, transparent pricing rules, and quality controls. Ideally connected to your property management workflows so requests, updates, photos, invoices, and tenant communications live in one place.
Why does this matter now? Maintenance performance is measurable at scale, and benchmarking shows that operational discipline can materially improve outcomes. Property Meld's 2024 benchmarking report, based on 8.6 million work orders, found repair speeds improved by 6.1 days (a 7.6% improvement) versus 2023, alongside cost reductions in vendor invoices (down 2%) and technician costs (down 15%). Those gains reflect what many managers already know. Faster routing, better vendor coordination, and clearer communication reduce both time-to-complete and cost.
For independent landlords and small-to-mid-size managers, the practical challenge is vendor management without a vendor management department. DIY sourcing can work, until it does not. Two examples:
- If you self-source a roofer after a storm, you might get anyone who answers the phone, not necessarily someone licensed, insured, and available within a defined window.
- If you manage 40 to 200 units, you cannot personally chase certificates of insurance (COIs), verify endorsements, and track renewal dates. Yet one uninsured injury on-site can become a catastrophic exposure.
Curated directories and pre-vetted networks (especially those that integrate with your property management software) are increasingly attractive. The best versions combine compliance verification, performance data, standardized pricing expectations, and workflow automation that keeps tenants informed and units producing revenue.
Step-by-Step: How to Evaluate a Service Provider Network
Step 1: Start With Your Risk Profile and Maintenance Mission
Before you compare networks, define what "good" means for your portfolio. The right network for a single duplex is different from the right network for 250 scattered-site doors.
Build a simple maintenance profile
- Property types and ages. Older stock needs more plumbing and electrical depth.
- Unit dispersion. One building vs. 30 zip codes.
- Your after-hours reality. Do you answer calls, or do you need 24/7 dispatch?
- Your top recurring work orders. Clogs, HVAC, pest, leaks, appliance repair.
Then decide your mission priorities. Speed, price stability, resident experience, or risk reduction. Pair operational discipline (Property Meld benchmarking emphasizes tracking repair speed) with the tenant perspective (AppFolio and Freddie Mac research both point to maintenance responsiveness as central to satisfaction and retention).
Example. A 12-unit owner-operator may prioritize no-surprises pricing and rapid emergency response so they are not coordinating at 2 a.m. A 180-unit manager may prioritize coverage depth (multiple vendors per trade) and consistent SLAs to avoid bottlenecks during seasonal surges like HVAC in July.
When a network candidate claims "we are reliable," you will have a concrete definition to test against.
Step 2: Demand Pre-Vetting That Is Documented, Not Implied
A network is not inherently safer than DIY. It is only better if the vetting is strict, repeatable, and transparent.
At minimum, ask what the network verifies and how often they re-verify:
- Business identity and good standing
- Background screening standards for technicians entering occupied homes
- Complaint history and dispute handling
- License verification by trade and jurisdiction (many states provide online lookup tools, your network should do that work, not push it onto you)
Also check whether the network removes vendors who fail standards. "We onboard everyone" is not a selling point.
Example. If your tenant is a nurse sleeping during the day and a vendor repeatedly arrives outside the scheduled window, does the network treat that as a performance issue, or "just how contractors are"? If an electrician's license lapses, does the system automatically flag and suspend assignments until renewed, or do you find out after an incident?
The practical takeaway: make vetting auditable. If it is not documented, it is not reliable.
Step 3: Verify Insurance Requirements (Do Not Accept a Bare COI)
Insurance is where "cheap" vendors can become an existential risk. Vendor insurance requirements across the industry commonly call for Commercial General Liability (often $1M to $2M), Workers' Compensation (statutory), Employers' Liability, and Auto Liability (often $1M), with Certificates of Insurance listing the property manager or owner as additional insured where appropriate. Many guidelines also require policies from reputable carriers (often A.M. Best A-rated) and may require endorsements such as primary and non-contributory wording. Always confirm your specific limits with your own insurer.
Your network should do three things:
- Collect COIs and endorsements (not just a PDF that can be outdated)
- Validate limits, policy dates, additional insured status, and trade-appropriate coverage
- Track renewals and suspend non-compliant vendors automatically
Two quick examples that matter in practice:
- Workers' Comp gap. A drywall contractor injures an employee in your unit. If they do not carry Workers' Comp and you hired them directly, you can get dragged into the claim. A network that enforces Workers' Comp compliance reduces that risk.
- Auto Liability gap. A vendor backs into a tenant's car in the parking lot. Without adequate Auto Liability, you may be dealing with an angry tenant and a messy recovery process.
If a network cannot explain its insurance compliance process in plain language, treat that as a red flag.
Step 4: Confirm Licensing and Trade Standards by Specialty
Licensing is not uniform. Some states require licenses for plumbers, electricians, and HVAC techs. Others vary by scope and project value. Regardless, your selection criteria should reflect the risk level of the trade.
A strong network will:
- Require licenses where mandated and verify status directly
- Match job types to credential levels (a licensed electrician for panel work, not a general handyman)
- Maintain multiple vendors per trade so you are not hostage to one schedule
This matters because specialty trades drive the highest-stakes failures. Electrical hazards, gas leaks, and HVAC outages in extreme temperatures.
Example. Your tenant reports "burning smell from outlet." A network that auto-routes to a qualified electrical vendor (not the cheapest generalist) can prevent escalation. Your HVAC fails on a holiday weekend. Networks with deeper specialty coverage can reduce downtime, especially with SLA rules and dispatch logic.
If the network offers "one vendor who does everything," be cautious. You want breadth across trades plus depth within each trade.
Step 5: Require Response-Time SLAs That Match Real Maintenance Categories
"Fast response" is meaningless without definitions. Ask for SLA targets by category:
- Emergency. Water intrusion, no heat in winter, electrical hazards.
- Urgent. Leaking sink, partial HVAC, refrigerator down.
- Routine. Dripping faucet, minor drywall, filter replacements.
Property Meld's benchmarking shows that improving repair speed is an industry-wide priority and achievable with disciplined processes. From the tenant angle, maintenance responsiveness is repeatedly tied to satisfaction and retention outcomes.
What to look for
- Acknowledgment time. How quickly someone confirms receipt.
- Scheduling window. How quickly a visit is set.
- Time to completion. How quickly the job is closed, not just started.
- After-hours coverage. Clear rules, not "call our vendor and hope."
Example. A leak reported Friday at 5:30 p.m. If the network cannot dispatch until Monday, you risk water damage and tenant anger. A routine request like a closet door repair should not consume three weeks. That signals poor routing capacity or insufficient vendor density.
The best networks share performance reporting (median completion times by trade and region) so you can manage by data, not anecdotes.
Step 6: Insist on Transparent Pricing and Invoice Controls
Maintenance cost control is not just negotiating cheaper rates. It is preventing invoice surprises and repeat work.
Look for a network that offers:
- Standard trip fees or diagnostic ranges by trade
- Not-to-exceed thresholds before approval is required
- Photo documentation for before and after and parts used
- Invoice line-item standards (labor hours, material markups, disposal fees)
Property Meld reported vendor invoice costs decreased by 2% in its benchmarking dataset, suggesting that process improvements and oversight can reduce costs even when market pricing is volatile. You cannot assume a network will automatically be cheaper. You are buying predictability and fewer mistakes.
Example. A vendor bills 6 hours for a 45-minute garbage disposal swap. With standardized invoicing and approval gates, that is caught before payment. You approve a $300 faucet replacement, then receive a $650 invoice due to "additional parts." A network with rules-based approvals prevents that gap.
This is also where vendor reviews shine. You can see patterns. Vendors who consistently overcharge or under-document tend to earn poor feedback over time.
Step 7: Evaluate Geographic Coverage and Vendor Depth (Not Just "We Serve Your Area")
Coverage is not binary. Many networks "serve" a metro area but have thin availability in outer zip codes or only one provider per trade. You want:
- Multiple vendors per specialty per region (depth)
- Backup capacity for peak seasons (HVAC, plumbing freezes, storm roofing)
- Clear service boundaries and travel fees (transparency)
Operational efficiency research and industry commentary increasingly point toward technology and coordination as differentiators, especially where labor shortages and higher repair costs pressure operations.
Example. You manage scattered single-family rentals across 8 suburbs. If the network has only one plumber who covers all, your network is a single point of failure. You operate a 90-unit building. If the network has deep appliance repair but weak elevator or roofing referrals, you will still end up DIY sourcing for the riskiest jobs.
Ask the network to show a map (or list) of active providers by trade, and how many are accepting new work now. Not "coming soon."
Step 8: Prioritize Software Integration and Quality Assurance
This is where pre-vetted networks can become decisively better than DIY. Integrated workflows reduce your administrative load while improving tenant communication.
A strong, software-integrated network should enable:
- Work order intake, then vendor dispatch, then status updates, then completion photos, then invoice sync
- Tenant notifications (scheduled time windows, delays, completion confirmation)
- Vendor reviews so you can rate vendors and the platform uses that to improve outcomes over time
Property Meld's benchmarking underscores the value of tracking KPIs like repair speed and using data to improve maintenance performance. Pair that with renter research showing maintenance responsiveness shapes satisfaction and move-out decisions. Integration turns those insights into repeatable operations.
Practical example. A small manager overseeing about 60 units moved from "text-a-contractor" to a pre-vetted, software-connected directory with standardized dispatch and vendor reviews. Their biggest change was not cheaper invoices. It was fewer follow-ups. Tenants got automatic updates, and the manager had an audit trail for every work order. Result: fewer complaints and faster turns. That matters because vacancy and turnover costs can be substantial, with turnover estimated around $3,872 on average in one industry analysis.
Quality assurance questions to ask
- Do they re-score vendors quarterly using completion time, callback rate, and review trends?
- Do they have a remediation process for bad work (rework policies, escalation paths)?
- Can you see performance dashboards by property and trade?
If the network cannot measure quality, it cannot consistently deliver it.
Checklist: Compare Service Provider Networks Side-by-Side
Use this checklist to compare service provider networks. Score each item 0 to 2 (0 = missing, 1 = partial, 2 = strong). Keep notes.
A) Vetting and compliance
- Documented vendor pre-vetting process (identity, business standing, screening)
- License verification by trade and jurisdiction, with ongoing re-checks
- Insurance enforcement: GL ($1M to $2M typical), Workers' Comp, Auto. COI tracking and renewals.
- Additional insured and endorsement handling (where appropriate)
B) Performance and SLAs
- SLA definitions by emergency, urgent, routine. Published targets.
- After-hours dispatch rules and escalation path
- KPI reporting (completion time, callback rate, tenant satisfaction)
C) Pricing and invoice controls
- Transparent trip and diagnostic fees or pricing ranges
- Not-to-exceed thresholds and approval gates
- Standard invoice line items and photo documentation
D) Coverage and capability
- Vendor depth by trade (HVAC, plumbing, electrical, roofing, pest, appliances)
- Geographic coverage map and travel fee clarity
- Seasonal surge capacity
E) Workflow and accountability
- Software integration. Work orders, status updates, invoices.
- Vendor reviews with visible history
- Quality assurance. Rework handling, vendor removal policy.
Two quick ways to use it
- Run the checklist on your current DIY roster to see your gaps.
- Run it on a curated directory or network option to quantify the time you will save.
FAQ
How do I know if a network is truly pre-vetted?
Ask for the exact compliance list (licenses, insurance types and limits, renewal tracking) and what causes removal. If they cannot explain how they validate COIs and keep them current, they are likely just a referral list. Vendor insurance requirements commonly include GL, Workers' Comp, and Auto, with COIs and endorsements handled correctly. A network that does the work of verifying compliance on an ongoing basis is doing real work. A network that just hands you a list is not.
What insurance limits should I require for maintenance vendors?
Many vendor requirement guides commonly cite Commercial General Liability in the $1M to $2M range, plus Workers' Compensation (statutory) and Auto Liability (often $1M). Exact needs vary by job risk and your insurer's guidance, but a good network should standardize minimums and track renewals. Confirm your specific requirements with your own insurance broker and your property's policy, since requirements can vary by jurisdiction and by the type of work being performed.
Is software integration really worth it if I only manage a few units?
Yes, when it reduces after-hours stress and prevents missed follow-ups. If maintenance responsiveness affects tenant satisfaction (and renter research shows it does), then even a 5 to 10 unit landlord benefits from faster coordination and better communication history. The value is time, documentation, and fewer escalations. A documented timeline of every work order also protects you if a tenant later disputes a repair, deposit deduction, or habitability claim.
How do reviews help if every contractor has some bad days?
Vendor reviews are not about perfection. They reveal patterns. Chronic lateness, poor documentation, repeat callbacks, or invoice issues. When paired with KPI benchmarking (repair speed, completion time), they help you select vendors based on consistent performance, not one-off impressions. The patterns are the signal. A single late arrival is not. A vendor who is late on three out of five jobs in a month is.
What to Do Next
Pick two networks (or a curated directory plus your current DIY approach) and run the checklist above this week. The best solution will feel less like "finding contractors" and more like installing a repeatable maintenance system. Documented compliance, SLAs, transparent pricing controls, and vendor reviews that keep quality high over time.
But here is the thing most landlords miss. The network you choose is only as effective as the documentation and workflow you wrap around it. The reason maintenance feels chaotic is rarely that you cannot find a vendor. It is that the work order, the tenant communication, the vendor invoice, the before-and-after photos, and the audit trail all live in different places. The fix is not just a better directory. It is a maintenance workflow that captures all of it in one system, tied to the property and unit, in real time.
That is what Shuk's maintenance request tracking is built for, and it is what makes any service provider network you choose actually deliver.
Shuk's maintenance request tracking lets tenants submit repair requests with photos, videos, documents, and notes, all timestamped and tied to the specific unit. You track each request from first report through completion, with a complete maintenance history maintained by property. You can create landlord-only maintenance tasks (for example, the inspection visit before a vendor quote) that are not visible to the tenant, choosing what to share and what to keep internal. Document storage keeps the vendor's quote, the COI, the invoice, and the before-and-after photos organized in one place per request. Centralized in-app messaging with email and push notifications gives you a time-stamped communication record of every scheduling exchange, status update, and completion confirmation, between you, the tenant, and (when needed) the vendor. And payment requests let you bill a tenant directly for tenant-caused damage when your lease allows it, with attached notes and receipts.
The result. Whatever service provider network or DIY roster you use, every work order becomes a complete case file. Request, photos, communications, vendor documentation, invoices, and tenant confirmation. That is the audit trail that protects you when a tenant disputes a deposit deduction, when an insurance claim needs documentation, or when a vendor's work fails six months later and you need to prove what was done.
Around maintenance, the same Shuk subscription gives you the rest of the rental operating stack. Online rent collection with zero ACH transaction fees and configurable late fees applied automatically. Tenant screening through our partner. E-signature for leases through our Adobe-powered integration. Schedule E-aligned expense organization with digital receipts (so vendor invoices feed directly into your year-end reporting). The Lease Indication Tool for renewal forecasting. Two-Way Reviews between landlords and tenants (not vendors). And Year-Round Marketing.
At $5 per unit per month with no setup fees, and with White Glove Onboarding included at no additional cost (where the Shuk team handles property setup, account preparation, and renter onboarding for you), Shuk makes documented maintenance discipline feasible for landlords and property managers running 1 to 100 units. Shuk now supports third-party management with multi-user workflows and role-based access, so a property management team can run consistent maintenance documentation across an entire portfolio.
Book a demo at shukrentals.com/book-a-demo to see how Shuk's maintenance request tracking with photos and documents, landlord-only maintenance tasks, document storage, centralized in-app messaging, payment requests, Schedule E-aligned expense organization, online rent collection with zero ACH fees, automated late fees, tenant screening, e-signature, the Lease Indication Tool, Two-Way Reviews, and Year-Round Marketing work together so every work order has a complete case file behind it.

How to Handle Pest Infestations: A Landlord's Guide to Effective Maintenance
A pest complaint is never just a bug. It is a habitability risk, a reputation risk, and often a cost snowball waiting to happen.
Here is the scale: about 14.8 million U.S. housing units reported rodent signs in a 12-month period, and roughly 14 million showed cockroach sightings according to U.S. Census housing-condition data. If you manage multifamily properties, the odds you will deal with pests at least once a year are high. Industry surveys show pest pressure is a routine operating reality for rentals across all property types and markets.
The hard part is not admitting pests happen. The hard part is managing the crisis fast, documenting every step, and preventing repeats without blowing your budget or mishandling tenant communication. That is where most independent landlords get stretched thin: you are coordinating inspections, scheduling vendors, tracking follow-ups, and trying to keep a clear paper trail while tenants understandably want immediate answers.
This guide shows you how to run pest response like a professional maintenance program, from early detection through long-term prevention, while keeping requests, messages, photos, vendors, and expenses organized in one place.
Treat every pest report as a time-sensitive maintenance work order with documentation, deadlines, and a prevention plan, not an informal "I'll swing by later" task.
What Effective Pest Control Actually Requires
Effective pest control in rentals is less about a single exterminator visit and more about a repeatable system. The most reliable approach is Integrated Pest Management, a prevention-first framework that reduces pests by combining sanitation, exclusion through sealing entry points, targeted treatment, and ongoing monitoring instead of relying only on sprays. Many housing and public-health programs emphasize IPM because it is safer, more sustainable, and often more cost-effective over time.
You also have legal obligations. Across the U.S., the implied warranty of habitability generally requires landlords to keep rentals safe and healthy, often tied to local housing codes and public health standards. Pest infestations can fall squarely into that territory and the rules vary significantly by state and city. New York City's Local Law 55 prioritizes IPM-style remediation and sets compliance expectations around indoor allergen hazards including pests. Chicago's bed bug ordinance requires documented timely action and can impose significant daily fines for violations. Texas sets repair and remedy rules and timelines when health and safety is affected. Florida includes pest control in habitability obligations in many rentals, with property-type caveats and notice requirements in certain circumstances.
The winning operational formula is to detect early, communicate clearly, choose the right method, budget intentionally, and prevent recurrence. Use a single system of record for requests, messages, invoices, and follow-ups. If it is not documented, it might as well not have happened, especially during disputes.
Five Steps to Managing Pest Infestations Like a Professional
Step 1. Identify What You Are Dealing With and Why It Is Happening
Start by classifying the pest and confirming your assessment with an inspection rather than assumptions. The most common rental-property pests have different drivers, health impacts, and best first moves.
Rodents. National housing data shows rodent signs are widespread, with approximately 14.8 million U.S. housing units reporting sightings or signs in a year. Rodents can carry diseases and contaminate food. They also chew wiring and building materials, increasing fire and repair risk. The CDC emphasizes prevention and safe cleanup rather than reactive treatment alone.
Cockroaches. About 14 million U.S. housing units reported cockroach sightings in a year, and sightings are strongly associated with structural deficiencies. Roaches are a well-documented asthma trigger, and housing research links cockroach allergens with increased asthma morbidity especially where cracks, moisture, and disrepair persist.
Bed bugs. NPMA research underscores how pervasive bed bugs are across housing types, with pest professionals reporting bed bugs across apartments and single-family homes at very high rates. Bed bugs are not known for disease transmission but they cause significant psychological distress and tenant disruption, and they are commonly misidentified.
Ants. Ant activity commonly spikes in spring and summer and is often linked to moisture, landscaping, and entry points.
Your legal duty: In most jurisdictions you must provide habitable housing. The Legal Information Institute explains the implied warranty of habitability as a baseline doctrine requiring landlords to maintain safe livable conditions, often tied to code compliance. Beyond that baseline, local rules can be highly specific, so confirm timelines and requirements for your jurisdiction before responding.
What identification looks like in practice: One roach sighting in a condo unit likely indicates German roaches, which often signal a larger hidden population. Prioritize a building-wide inspection rather than a single-unit spray. Rodent droppings in a basement laundry room should be treated as an exclusion problem covering gaps, doors, and penetrations plus sanitation, not just traps. When a tenant reports bites, avoid guessing. Schedule a qualified inspection and ask for photos or specimens rather than relying on bite patterns, since bed bugs are frequently misidentified.
Classify the pest, confirm with inspection rather than assumptions, and map likely sources across food, water, shelter, and entry points. Then match your response to the pest and your local legal timeline.
Step 2. Communicate With Your Tenants Clearly and Quickly
Pest problems escalate when tenants feel ignored, or when landlords act without clear notice and preparation instructions. Your goal is to be fast, calm, and specific.
A professional response timeline you can reuse: Within 24 hours, acknowledge the report, request photos and details, and provide immediate safety and containment tips. Within 48 hours, schedule an inspection through your maintenance tech or a pest professional. Within 72 hours, schedule treatment or provide a written plan and date window. Adjust this timeline for your jurisdiction, the severity of the infestation, and vendor availability. For some issues like bed bugs, certain cities require faster formal steps.
Tenant-ready scripts:
Acknowledgment within 24 hours: "Thanks for letting me know. I am opening a pest-control work order today. Please reply with where you saw activity, when you saw it, and any photos. We will schedule an inspection within 48 hours and share next steps."
Preparation instructions before treatment: "To make treatment effective, please complete the attached prep checklist by this date: remove items from under sinks, seal food, reduce clutter, and follow any laundry or bagging steps provided by the pest company."
Entry notice reminder: "We will provide the required notice before entry, and the technician will only access the affected areas unless you authorize otherwise." This is particularly important in states with explicit notice rules such as California's Civil Code entry requirements.
Documentation as your best defense: Keep a single organized record covering the tenant report date and time, photos and videos, inspection notes including "no evidence found" when applicable, vendor recommendations and treatment plan, notices to enter and tenant prep confirmations, and invoices and follow-up outcomes. This matters because tenant remedies including repair-and-deduct and rent withholding can hinge on whether you responded timely and reasonably under habitability standards. Without records you also cannot spot patterns such as a recurring unit, a recurring vendor, or a recurring entry point.
Communication examples: An ant surge after heavy rain where a tenant reports ants in the kitchen: respond the same day, ask for photos, provide immediate steps, schedule an inspection for the moisture source, and seal the entry point near a plumbing penetration. A bed bug allegation in a six-unit building: notify adjacent units for inspection without naming the reporting tenant, document everything, and issue prep instructions early to prevent spread and reduce re-treatments.
Create one standard pest communication workflow covering acknowledge, inspect, treat, and follow up, and keep it in writing. Consistency builds tenant trust and reduces legal risk.
Step 3. Choose the Right Extermination Method
Your method should be driven by pest type, severity, building layout, and health and safety risk.
DIY versus professional service: DIY is reasonable for minor isolated issues such as a few outdoor ants or a single mouse caught early, if local law and lease terms allow and you can safely execute. Professional service is strongly recommended for bed bugs, recurring roaches, and multi-unit rodent activity because partial treatment can push pests into adjacent units and worsen the problem.
Why IPM tends to win in rentals: EPA and housing-focused IPM guidance emphasizes combining sanitation to remove food sources, exclusion through sealing gaps, repairing screens, and adding door sweeps, moisture control through fixing leaks and improving ventilation, targeted treatment using baits, gels, dusts, and limited sprays as needed, and monitoring through sticky traps and follow-up inspections. IPM is particularly effective in multifamily because it addresses root causes including building cracks, penetrations, and shared chases, rather than masking symptoms.
Vendor vetting, what to ask before you hire: Request a written IPM plan for your building type, scope clarity covering which units and common areas are included, prep responsibility specifying what tenants must do versus what the vendor will handle, a re-treatment policy covering how many visits are included and over what timeline, documentation in the form of treatment reports you can store for compliance and disputes, and proof of insurance and licensing with local verification.
Method choices in practice: A bed bug situation handled late can balloon from approximately $1,200 when caught early through proactive inspection to $7,500 or more once multiple units, repeat treatments, and tenant disruption stack up. The operational lesson is to act fast, inspect adjacent units, and use a structured plan. For rodents in an older duplex, traps are secondary to exclusion: sealing gaps around utility penetrations and adding door sweeps. For German roaches in a multi-unit, a professional uses baits and crack-and-crevice treatment plus recommendations to seal wall gaps and address moisture.
Choose vendors who talk about exclusion, sanitation, and follow-ups rather than one-and-done spray solutions. One-and-done is rarely a real plan in rentals.
Step 4. Budget for Pest Control Intentionally
Pest control costs are easiest to manage when you plan for them like any other maintenance category: predictable baseline plus contingency reserve.
Typical cost categories to track: Initial inspection sometimes credited toward treatment. Treatment costs covering one-time or multi-visit service. Exclusion and repairs covering sealing, sweeps, screens, and minor carpentry. Unit turns covering deep cleaning and disposal of contaminated items especially in severe bed bug cases. Ongoing contract costs for quarterly or annual IPM monitoring.
Rodent infestation cost ranges can be wide depending on severity, from low hundreds to several thousand dollars when exclusion and repairs are needed. Your real financial risk is the secondary cost: vacancy loss, tenant concessions, repeated callbacks, and potential code enforcement exposure.
Sample budget comparison by approach:
DIY traps and baits cover materials and your time. Best for early isolated mouse or ant activity. The risk is missing the root cause and generating recurring service calls.
A one-time professional visit covers treatment and a short follow-up. Best for minor roach or ant issues with a verified limited scope. The risk is failure in a multi-unit setting without an IPM approach.
An annual IPM contract covers monitoring, targeted treatments, and reporting. Best for multifamily and recurring issues. The risk is that it requires consistent access and documentation to function as intended.
ROI of prevention: The bed bug early versus late example demonstrates classic return on investment: spending a smaller amount early prevents a multi-unit spiral that becomes several times more expensive. The same logic applies to rodents where exclusion repairs feel expensive compared to traps but reduce repeat infestations and property damage risk.
Tracking pest expenses by property and by unit allows you to identify chronic hotspots. Attaching receipts and invoices to the work order ties every cost to the event and vendor. Categorizing spending by inspection, treatment, and repairs shows you what is driving totals. Documenting tenant-caused conditions with photos and notes is useful if your lease allows chargebacks and your local law permits it.
Do not manage pest costs from your bank feed alone. Track by unit and property and by category so you can eliminate repeat spend rather than just paying it.
Step 5. Prevent Future Infestations Through a Maintenance Schedule and Tenant Education
Prevention is where small landlords can outperform larger operators because you can be nimble and consistent. The key is converting pest events into maintenance standards.
A practical IPM-based prevention cycle: Quarterly or seasonal inspections of common areas, basements, trash areas, mechanical rooms, and the exterior perimeter. Exclusion tasks covering door sweeps, sealing penetrations, repairing screens, and weatherstripping. Moisture control through fixing leaks within a defined service-level agreement, cleaning gutters, and checking crawlspaces. Sanitation standards covering trash storage rules, dumpster area cleanliness, and tenant guidance. Monitoring through strategic placement of glue boards in non-living areas where legal and appropriate, with trend tracking and scheduled follow-ups.
Tenant education that actually works: Tenants are part of the IPM system but you cannot rely on common sense. Provide short specific instructions at move-in and renewal: store food in sealed containers, report leaks immediately, reduce clutter especially for bed bug prevention and treatment prep, do not bring in discarded furniture without inspection, and follow trash rules. Keep it non-accusatory and framed as "how we keep the building healthy."
Record-keeping for compliance and continuity: Local laws can require documentation. Even where not required, your records help you prove timely response, track recurring building defects, improve vendor performance, and plan capital improvements such as sealing and building envelope repairs.
Prevention in action: Before spring, schedule a pre-season exterior walkthrough and seal foundation cracks near landscaped beds since ant activity often peaks in spring and summer. After repeated roach sightings, approve wall crack repairs and moisture fixes since housing condition improvements reduce triggers and infestation persistence. At unit turns, add a standard inspection step covering mattress seams and baseboards, and provide a tenant handout about avoiding curbside furniture.
Prevention is a schedule, not a slogan. Put recurring inspections, exclusion, and tenant education into your maintenance calendar and track completion like any other compliance task.
Pest Infestation Response Checklist
Intake, same day within 24 hours: Create a maintenance request noting pest type suspected, unit, date and time, and reporter. Request photos, video, exact locations, and frequency. Provide immediate containment tips covering food storage, clutter reduction, and avoiding pesticide misuse. Start a documentation folder covering messages, photos, and notes.
Inspection within 48 hours: Schedule inspection through in-house staff or a licensed pest professional. Send an entry notice per your state and city requirements. Inspect adjacent units if pest type warrants it, which applies to bed bugs and roaches in multifamily settings. Record findings including evidence found and contributing conditions such as cracks, moisture, and sanitation issues.
Treatment plan within 72 hours or per local law: Choose method based on an IPM plan with targeted treatment. Send tenant prep checklist with a clear deadline. Confirm whether temporary evacuation is needed since this is jurisdiction-dependent. Schedule the vendor and confirm scope covering units, common areas, and follow-ups.
Execution and follow-up over seven to twenty-one days adjusted as needed: Collect treatment report from vendor. Schedule re-check date and additional visits if required. Verify exclusion repairs completed covering door sweeps, seals, and screens. Close out only after monitoring confirms resolution.
Cost and compliance: Upload invoice and receipt categorized by inspection, treatment, and repairs. Track total cost per unit and property and note the root cause. Save all notices, reports, and tenant communications for your records.
Frequently Asked Questions
Am I always responsible for pest control as the landlord?
In many places you are responsible when pests affect habitability, especially when building conditions contribute. The implied warranty of habitability is a common baseline across the U.S. but specific responsibilities vary significantly by state and city. Review your local statutes and ordinances before assuming either full responsibility or full tenant responsibility for any pest situation.
Can I enter the unit immediately if there is a pest emergency?
Rules vary. Many states require advance notice for non-emergency entry, with California commonly requiring written notice often of 24 hours. For urgent health and safety issues, emergency exceptions may apply, but you should consult local rules before acting. Send and store all notices in a documented system so you have a timestamped record.
Should I treat only the affected unit in a multifamily building?
Often no. Bed bugs and German roaches can spread through walls, chases, and shared spaces, making adjacent-unit inspection and coordinated treatment plans more effective than single-unit treatment. IPM principles support building-wide thinking as the standard approach in multifamily settings.
What is the most common reason infestations keep coming back?
Root causes are not being fixed: entry points, moisture, clutter, trash handling, and inconsistent follow-up are the usual culprits. Research links housing disrepair including cracks and gaps with roach allergen persistence and ongoing infestation challenges. IPM's core principle is to correct conditions rather than simply eliminate pests repeatedly.
Turn pest control into a repeatable maintenance system rather than a series of reactive emergencies. Book a demo to see how Shuk's maintenance tracking, centralized communications, and expense tools work together so you can log pest reports, standardize tenant messaging, attach documentation, schedule follow-ups, and track costs by unit and property without hunting through texts and emails when you need the record.
Frequently Asked Questions
Find answers to common questions about our products and services
How do I set up a preventive maintenance schedule that is realistic?
How do I prevent vendor no-shows and invoice surprises?
What is a reasonable maintenance turnaround time and how can workflows improve it?
What is the most important thing to measure first in a maintenance operation?
The most common maintenance failure for independent landlords is not a lack of effort. It is a lack of structure. When requests live in texts, vendor relationships are informal, and costs are tracked in bank feeds, everything feels equally urgent and nothing gets measured. A simple maintenance operating system, even one covering just ten preventive tasks, a two-tier vendor bench, and a five-status work order flow, outperforms any amount of good intention applied inconsistently. Platforms like Shuk are built specifically for independent landlords and property managers with 1 to 100 units, with maintenance request tracking, vendor coordination, photo and document storage, and expense categorization in one connected system at a predictable per-unit price.